
In GLOBE, you use careful measurements to learn things about our environment just as scientists do. Also, some of the data you take for GLOBE is used by scientists. Finally, what you learn from GLOBE about how to take measurements will help if you have the chance to volunteer to help in a local science study run by another organization.
I recently had the chance to help survey a rock layer about 300 kilometers southeast of Boulder, Colorado. We were there to see whether a reddish-brown rock layer was level or tilted (sloped) in some direction. Since I study weather and climate rather than geology, I was there as a citizen scientist — a volunteer, rather than a professional. We took GPS readings of latitude, longitude, and elevation at the top of the reddish-brown layer. The top was fairly easy to see if the layers were visible, since the rock layer above it was white. You can easily see where the layers meet in the cliffs in Figure 1. We call where the layers meet the “contact.”
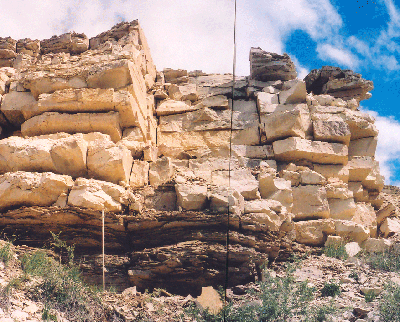
Figure 3 shows the results of our measurements. Combining the measurements for the two days, we found that the top of the reddish-brown layer sloped downward toward the north with about a 3% slope (if you go north 100 meters, the top of the rock layer will be three meters lower). Two other groups were following the rock layer a few kilometers away. Both groups found that the rock layer sloped toward the north, by about the same amount.
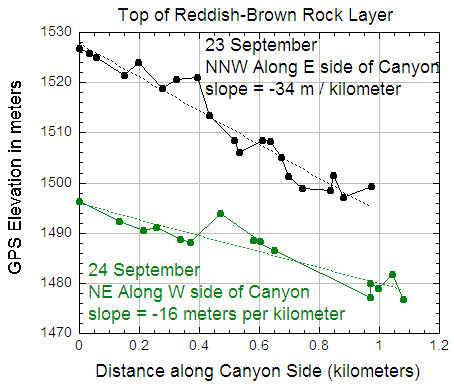
Figure 3. GPS elevations along the east side of the canyon (23 September) and the west side (24 September). North is to the right of the graph, so the rock layer is lower to the north.
We were surprised that the GPS elevations worked so well:
- First, the elevations varied rapidly on our GPS units.
- Second, GPS experts tell me the elevation is less accurate than the location.
- Third, we only took one reading at a location (though I would try to average the GPS elevation when it varied).
- Finally, while our GPS elevations agreed well with the elevation of the rock layer from a topographic map on second day, the two elevations differed by slightly more than 20 meters the first day.
In the next few entries, I will describe why we were so successful.