Data Tutorials
Data Tutorials
Important: To explore the most up-to-date data tutorial, visit the GLOBE Tutorial Center.
Need help working with and understanding GLOBE data? The resources gathered here are intended to clarify and support users' continued experience with GLOBE data, and they include instructions on how to use the Advanced Data Access Tool, the Application Programming Interface (API) and the Visualization System, among other tips and tricks.
GLOBE Data Fundamentals Webinar
The GLOBE Data Fundamentals Webinar is an introductory overview intended to instruct community members on how to use GLOBE's various data systems. During the webinar, members will learn about the various tools at their disposal, retrieving and analyzing GLOBE data in action, and how researchers and teachers understand and use GLOBE Data in their research
Members can watch the entire webinar, or jump to a relevant section, with the video and links below:
- GLOBE Visualization System
- Advanced Data Access Tool
- GLOBE Application Programming Interface (API)
- Tips and Tricks
Additional Resources
Download the materials presented in the webinar below:
- Presentation slides (pdf)
- October 2019 session Q&A (pdf)
- January 2020 sessions Q&A (pdf)
General Data Entry Tips
In the tips listed below, users can learn more about GLOBE Data Entry sites and how they are used in the data submission process. There are also tips on bookmarking specific sites and school IDs, as well as the prerequisites for setting up an automated weather station.
GLOBE Data Entry System
The GLOBE Data Entry System has a variety of helpful features and does not require users to create a Data Entry site before entering their data. The system can be found either in the GLOBE Observer app or at dataentry.globe.gov.
Additional Resources
Download a quick guide to the Data Entry system in either a .doc or .pdf format below:
Setting Up a Data Site
Additional Resources
Entering Measurement Data (Data Entry)
Additional Resources
Tutorials and Quick Tips
- Select the "GLOBE Data" tab on the top navigation bar.
- Select Data Entry.
- To open GLOBE's "Data Entry" tool:
- If you are using a desktop:
- Select Data Entry - Desktop
- If you are using a mobile device:
- Select Data Entry - Desktop
- If you are using a desktop:
- Select "Add site" next to the school that will have the new site.
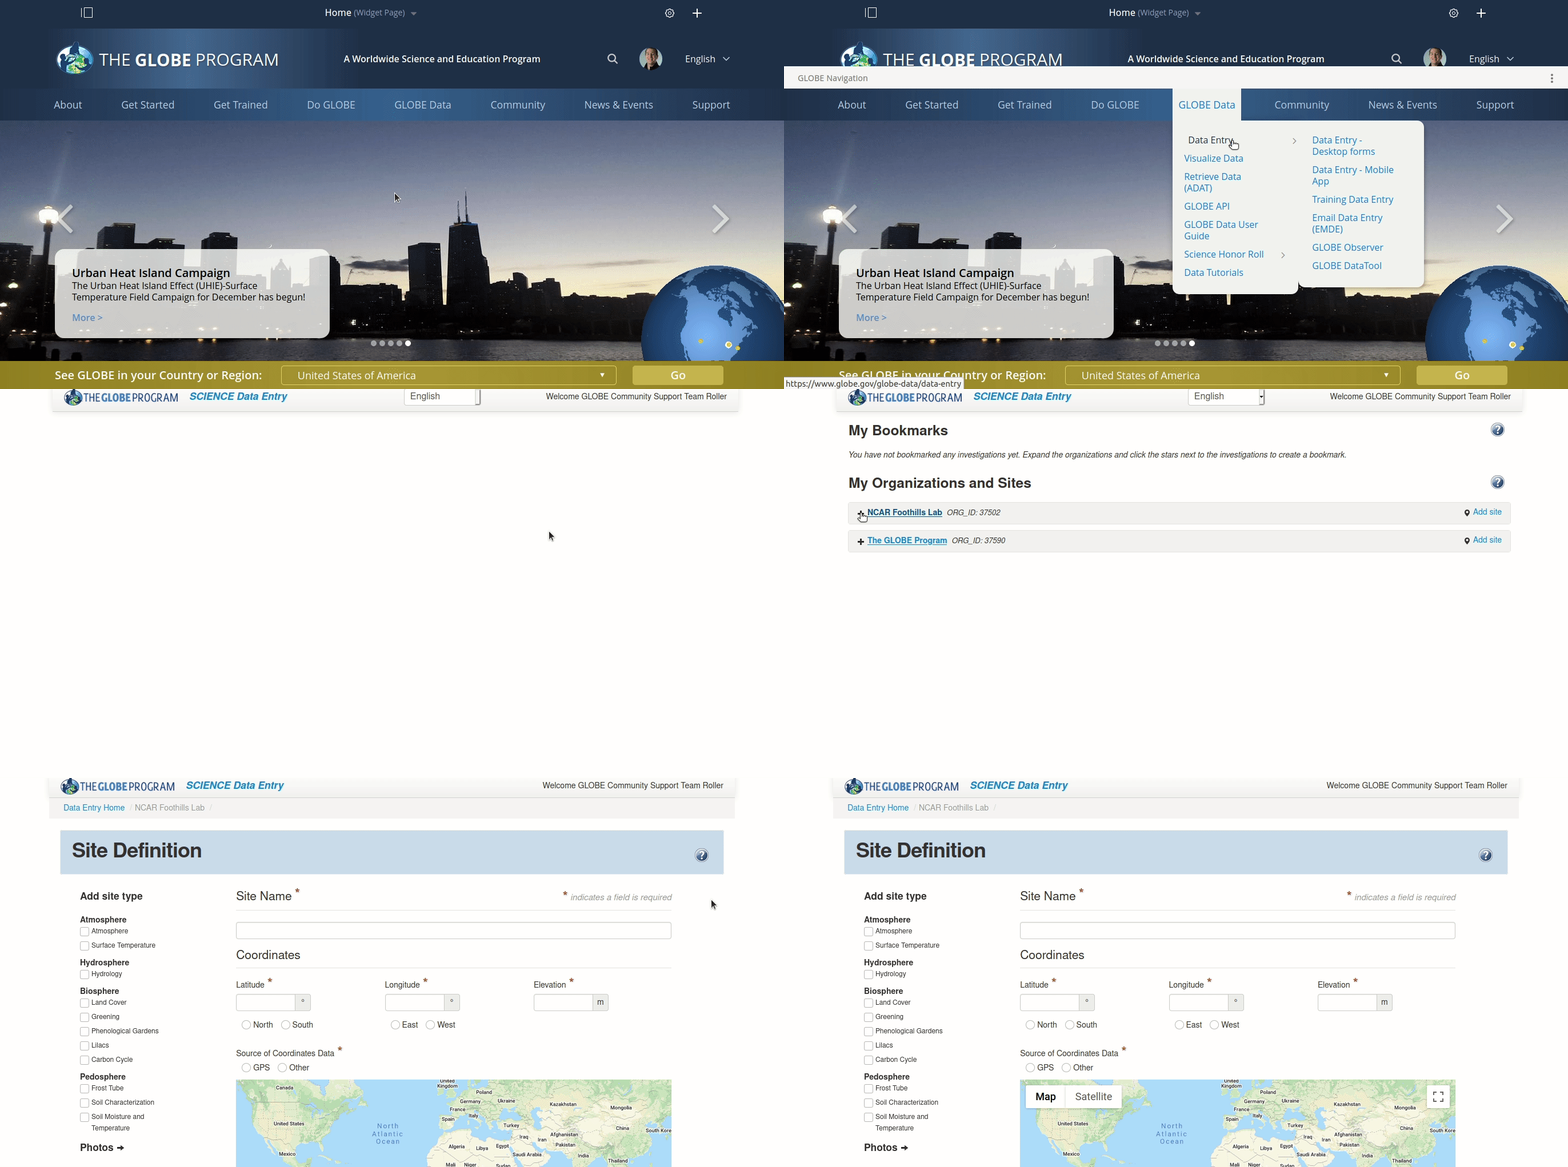
- In the "Site Name" field, add a name for the site.
- Complete the "Latitude," "Longitude," "Elevation" and "Source of Coordinates Data" fields.
- In the "Add site type" section on the right, select the type of the site according to the different protocols performed there.
- After selecting a site type, complete the required and non-required fields.
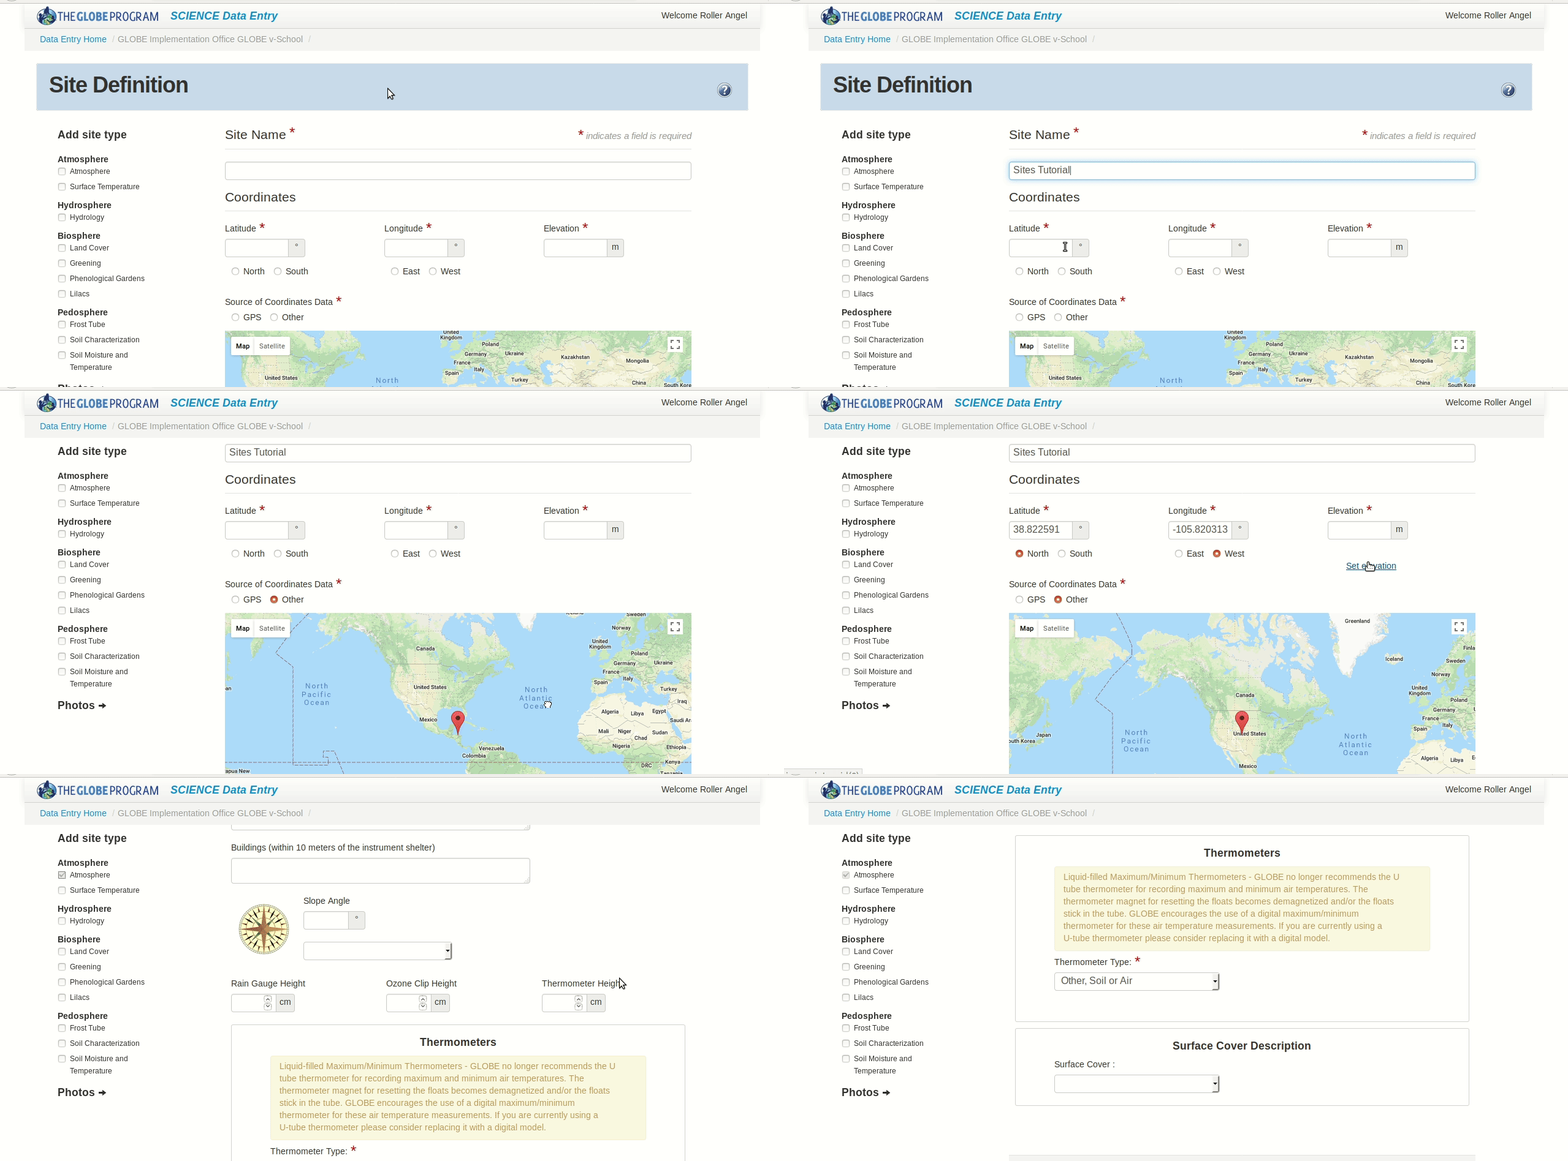
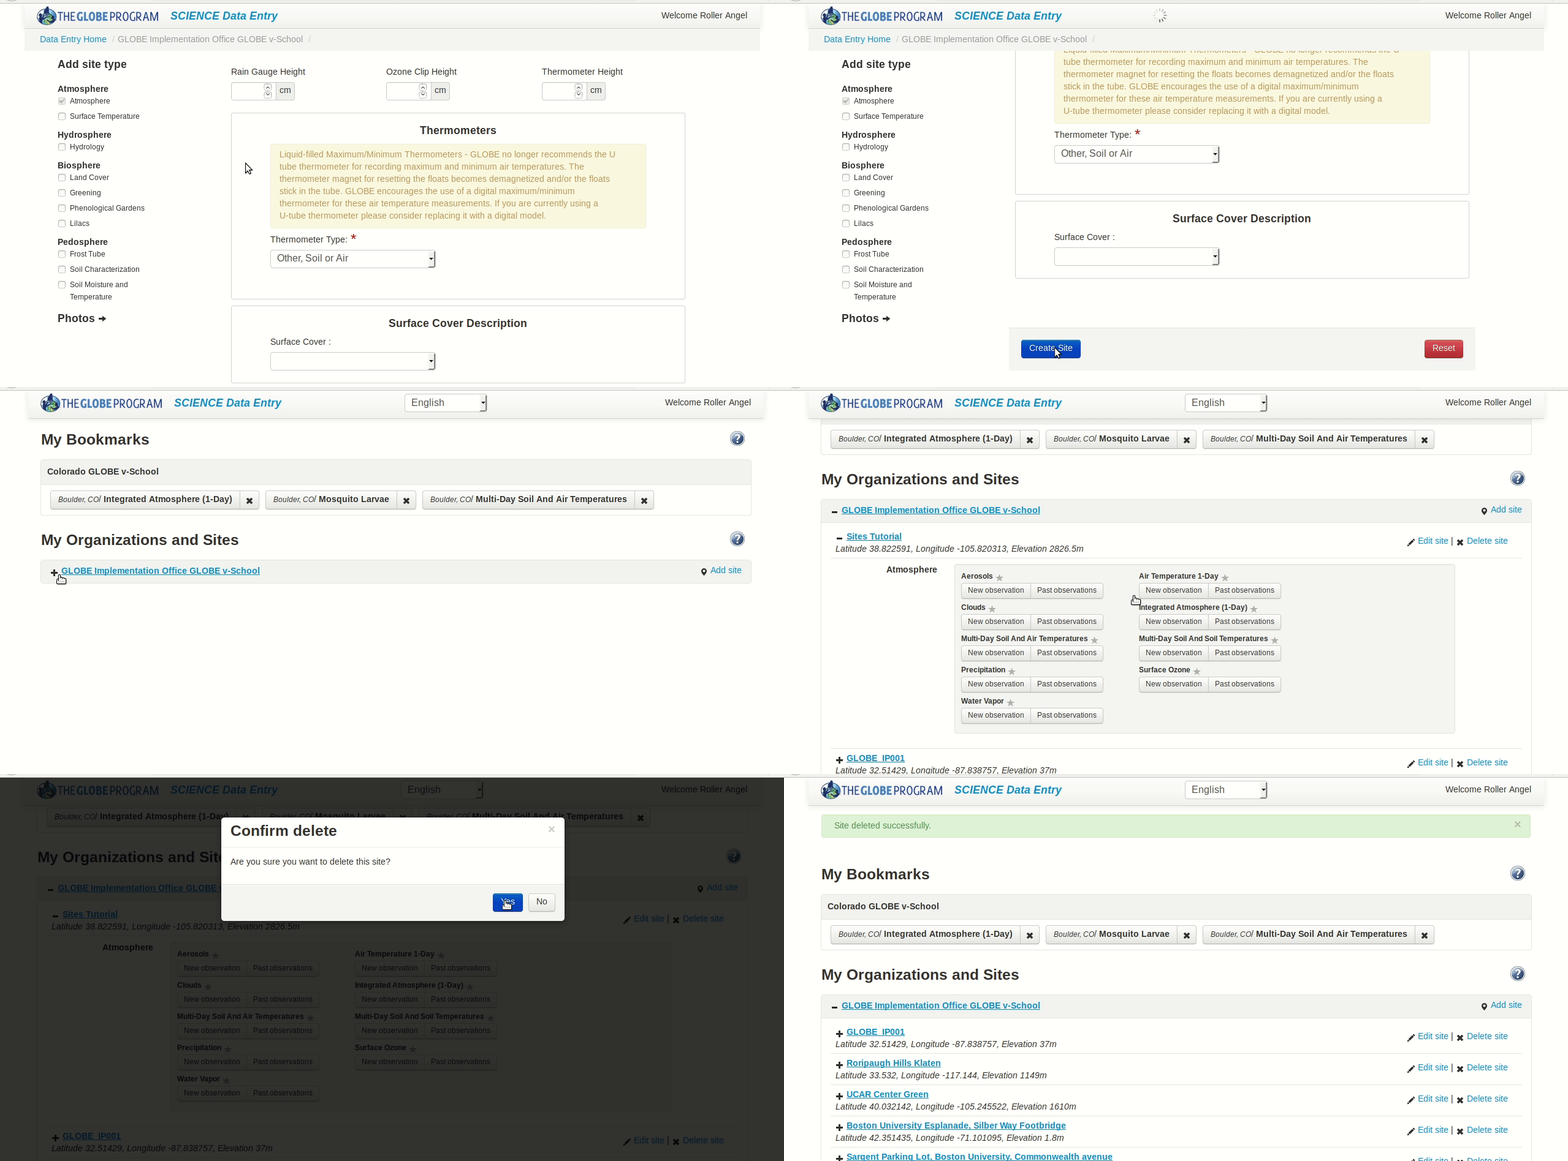
- At the bottom, select Create Site.
- To navigate back to the main Data Entry tool, at the top-left select Data Entry Home.
- Alternatively, select the GLOBE Program logo on the top left of the page.
- To view the listed site, next to the school or organization name where the site is located, on the left, select the "+" icon.
- To delete the site, on the right of the site description, select Delete site.
Note: Only sites without any data entry measurements may be deleted. For help deleting a site with data entry measurements, email globehelp@ucar.edu.
Follow the guides below to learn how to access site IDs using the GLOBE Visualization and GLOBE Data Entry tools.
Learn more about the General Format for Email Data Entry Measurements.
Find a Site ID with the GLOBE Visualization Tool
- Open the GLOBE Visualization tool.
- On the left, in the menu, select the "Filter" button.
- Click "Choose Site by School".
- Type in the name of the school.
- Select the school to find that school's Site ID.

Find a Site ID with the GLOBE Data Entry Tool
- Open the GLOBE Data Entry Tool.
- If the site is part of an organization:
- Next to the organization name, on the left, click the "+" icon.
- On the site, on the right, click "Edit site."
- The site ID will be listed directly under the site name.
- If the site is not part of an organization:
- On the site to edit, on the right, click "Edit site."
- The site ID will be listed directly under the site name.
- If the site is part of an organization:

Follow the guides below to learn how to access School IDs for Email Data Entry.
Learn more about the General Format for Email Data Entry Measurements.
Note: There are two versions of school IDs. The legacy version is called a School ID, and the new, recommended version is called an Organization ID.
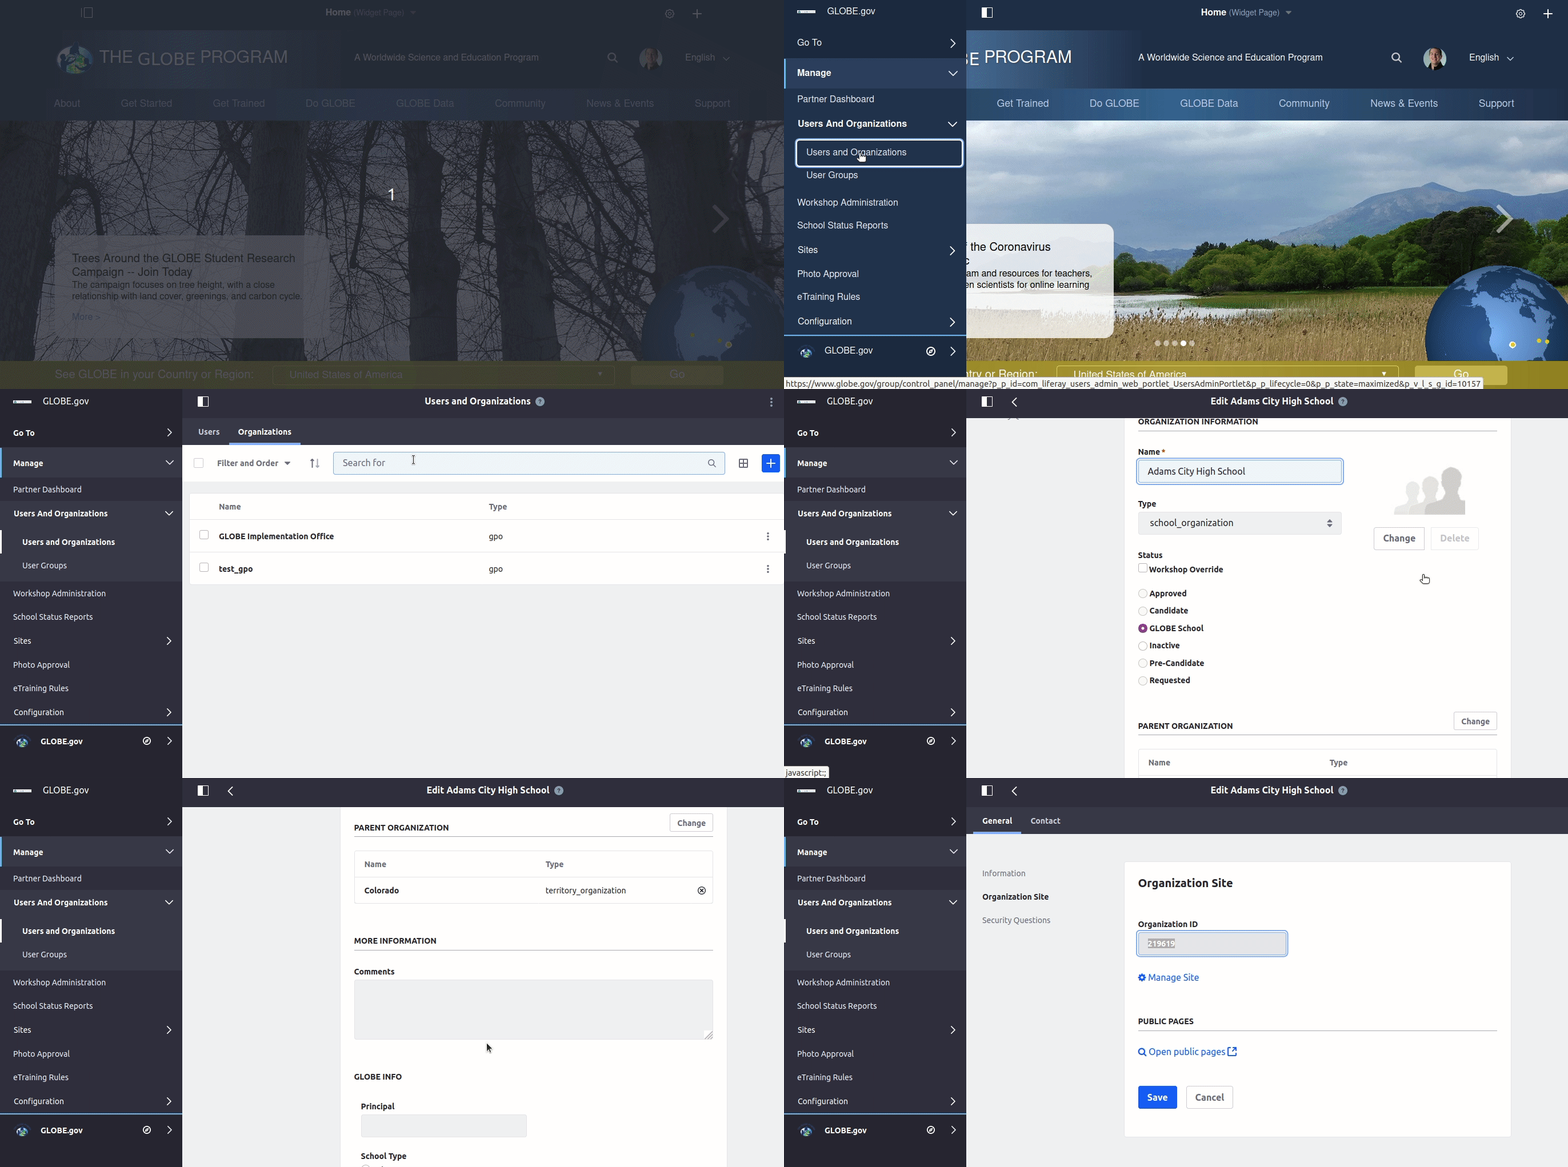
- Log in to the account on GLOBE.gov.
- On the main page, in the top left, click the "Menu" icon.
- In the menu bar, on the left, click on "Users and Organizations" category.
- In the dropdown menu, click on "Users and Organizations."
- At the top of the page, click on the "Organizations" tab.
- In the search bar, type in the the name of the organization to view.
- In the results field, find the organization to view.
- Next to the school name, on the right, select the "Configuration" icon (three vertical dots).
- Click "Edit."
- To find the School and Organization ID:
- In the "Information" tab, at the bottom, the School ID is next to the "GLOBE ID" section.
- In the "Organization Site" tab, the Organization ID is provided.
Tip: GLOBE recommends using the Organization ID instead of the School ID. When using the Organization ID, include a prefix of "ORG_ID:"; for example, "ORG_ID:10532858."
Bookmarks are a feature of the GLOBE Data Entry tool and require a GLOBE Site be defined prior to use. To learn how to create a site, follow the Sites tutorial. Then, return to this tutorial to learn how to use Bookmarks.
- Open the GLOBE Data Entry tool.
- If the site is part of an organization:
- Next to the organization name, on the left, click the "+" icon.
- Next to the site name, on the left, click the "+" icon.
- If the site is not part of an organization:
- On the site to edit, on the left, click the "+" icon.
- If the site is part of an organization:
To create a bookmark:
- Next to the protocol to bookmark, to the right of the title, click on the "star" icon.
To delete a bookmark:
- Under the "My Bookmarks" section of the page, at the top, find the bookmarked protocols.
- Next to the protocol bookmark to delete, on the right, click on the "x" icon.

Weather stations are manufactured by a variety of vendors in a wide array of formats, with each utilizing a different method for sending weather data to GLOBE's Databases. Follow the guides below to learn how to set up a few of the most popular weather station formats.
Tip: For help operating the weather station vendor's software, refer to the vendor's operation manual and customer support.
Weather Stations from DAVIS
Detailed step by step instructions on how to connect your Davis Weather station to GLOBE are available here:
3D-Printed Weather Stations
- Follow the instructions outlined in the Sites tutorial to create a site.
- During the site creation process, under the "Add site type" menu, on the left, select the "Atmosphere" box.
- In the "Thermometers" section of the page, select the "Thermometer type" menu.
- Select "Other, soil or air."
- At the bottom of the page, on the left, click "Create Site."
Important: When using a 3D-printed weather station to report data to GLOBE, use custom code outlined in the Email Data Entry sheet.

GLOBE Data User Guide
The purpose of the GLOBE Data User Guide is to help scientists and researchers understand, access and use available GLOBE data. This includes data collected by GLOBE-trained teachers, students and citizen scientists, as well as data submitted by automated weather stations and data loggers.
GLOBE Data Tools and General Tips
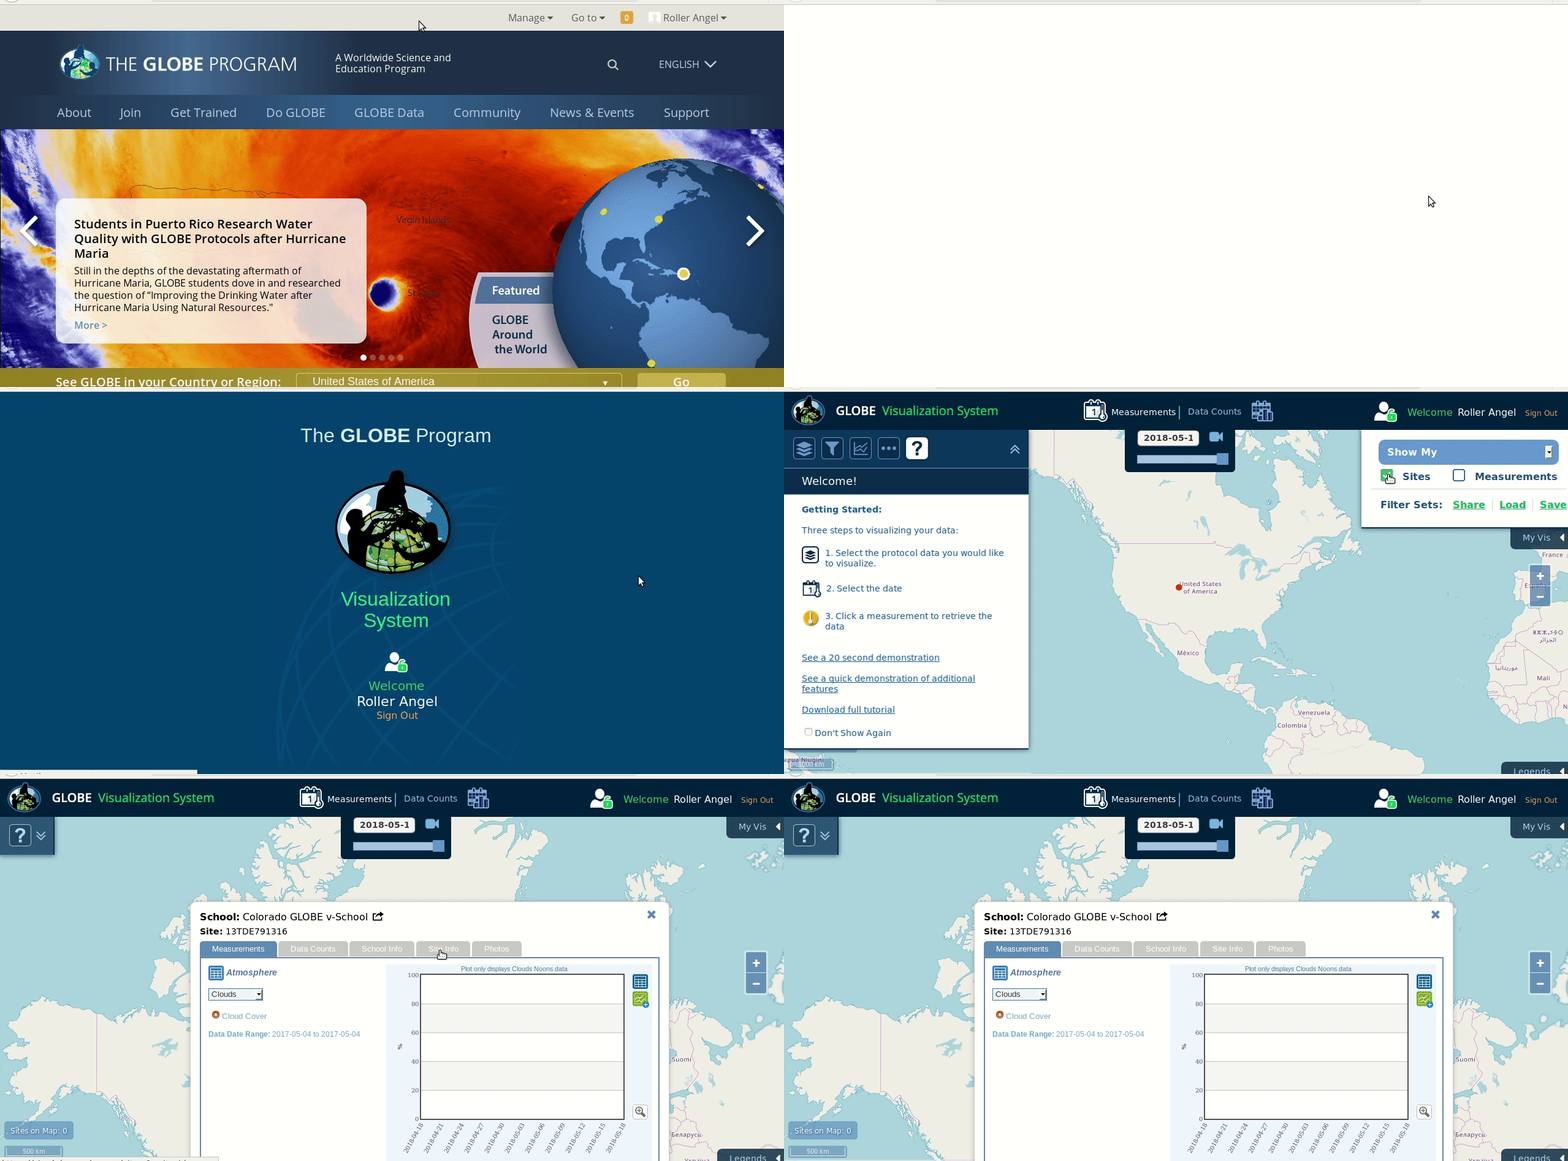
Using the GLOBE Visualization system to find, display, graph and retrieve data
- Log in to GLOBE.gov.
- Click on "Visualize Data."
- Click on "My Vis."
- Check the box labeled "Sites/"
- Click on one of the red dots to view the site's data.
- For further help information click on the "?".
Additional Resources
- Visualization tutorial (video)
- Advanced Data Access Tool tutorial (video)
- Visualizing and retrieving your data (PowerPoint)
- Visualization tutorial (PDF)
- "Organization" pages contain links you can use to navigate directly to a site.
- If a user knows the Site ID of a site, they can use the GLOBE Visualization System's links to navigate directly to the site. To use this functionality, copy and paste the relevant ID after the "site_ID=" section in the Visualization System's URL. For example: https://vis.globe.gov/GLOBE/?site_id=32534
- If a user does not know the Site ID of a site, they can use the filters in the Visualization System to find the site.


